
Directlink domains may occasionally become blocked by ad blockers or similar tools. To prevent this, the domains are updated periodically to ensure they remain accessible. One way to automatically access the most current domain is through PHP integration. Using a direct link requires manual updates if the domain becomes blocked, which can be time-consuming. To avoid this, it’s recommended to use PHP integration if you have the necessary access to upload files to a server that supports PHP.
Let’s see how to create a directlink with PHP integration and insert it in your website.
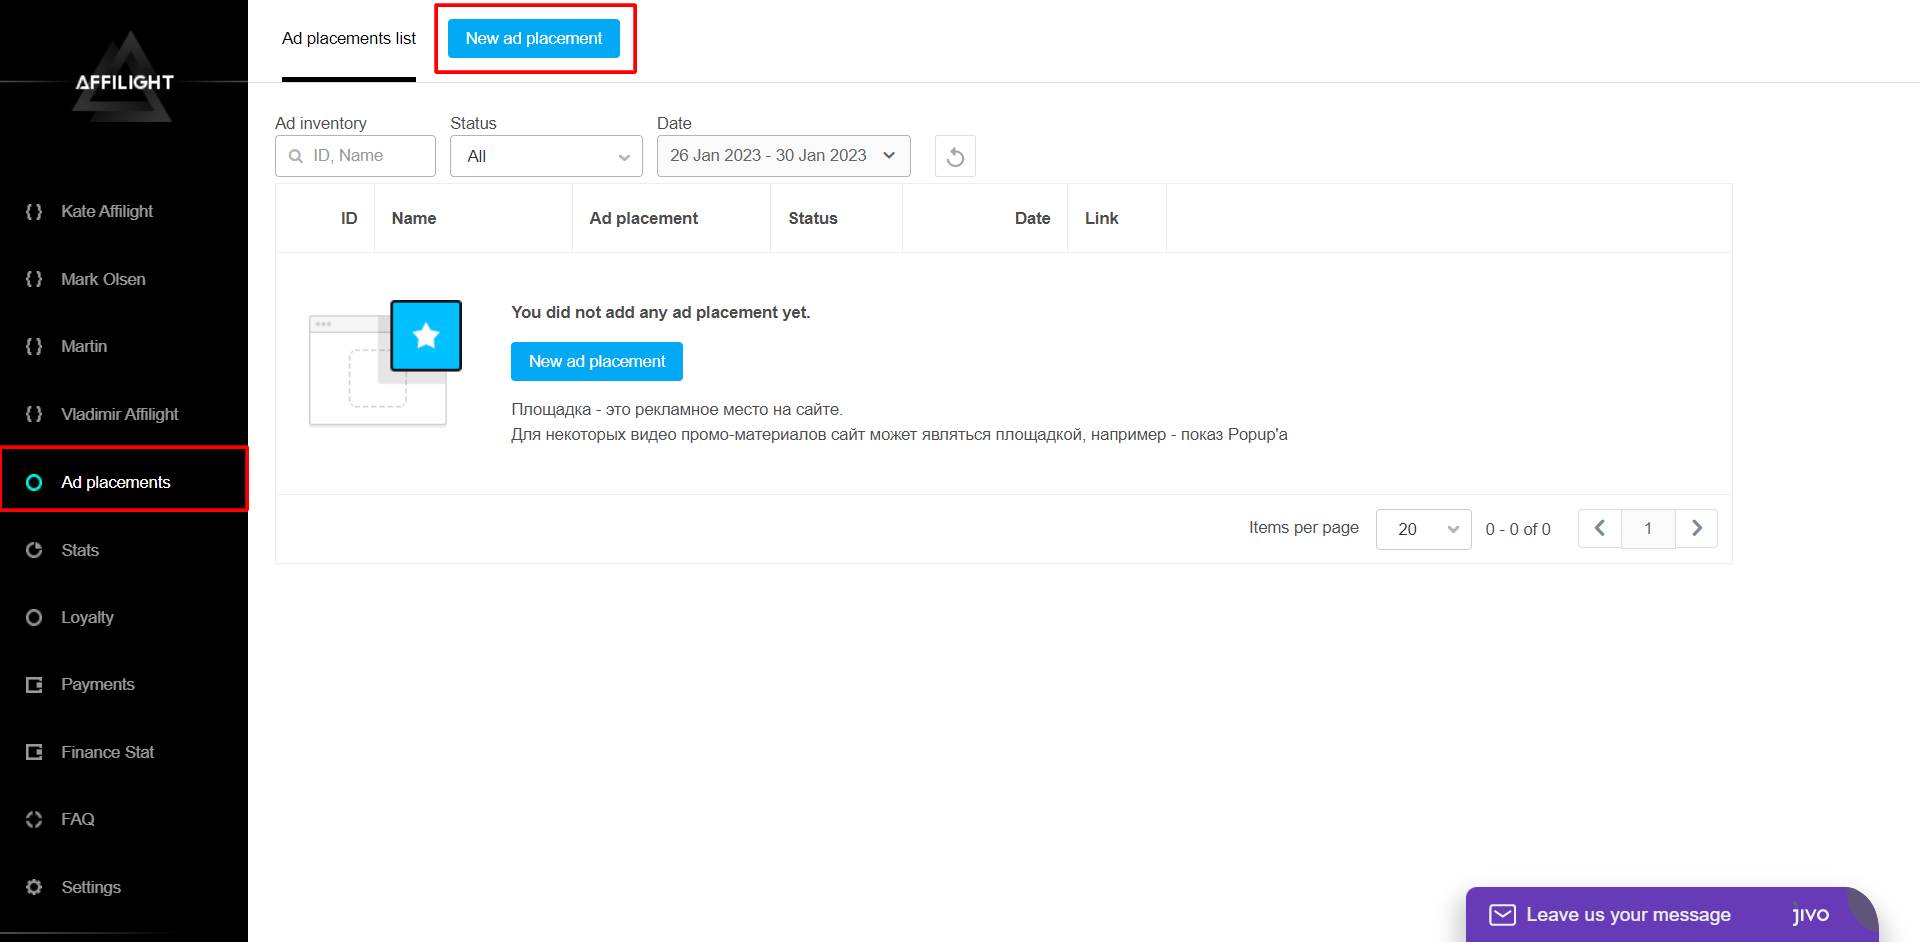
Ad Placement Creation
Before creating an ad placement, you need to register as a webmaster. You can register on Affilight’s landing page by yourself or our manager can register you by request.
To create an ad placement, click the button New Ad Placement.
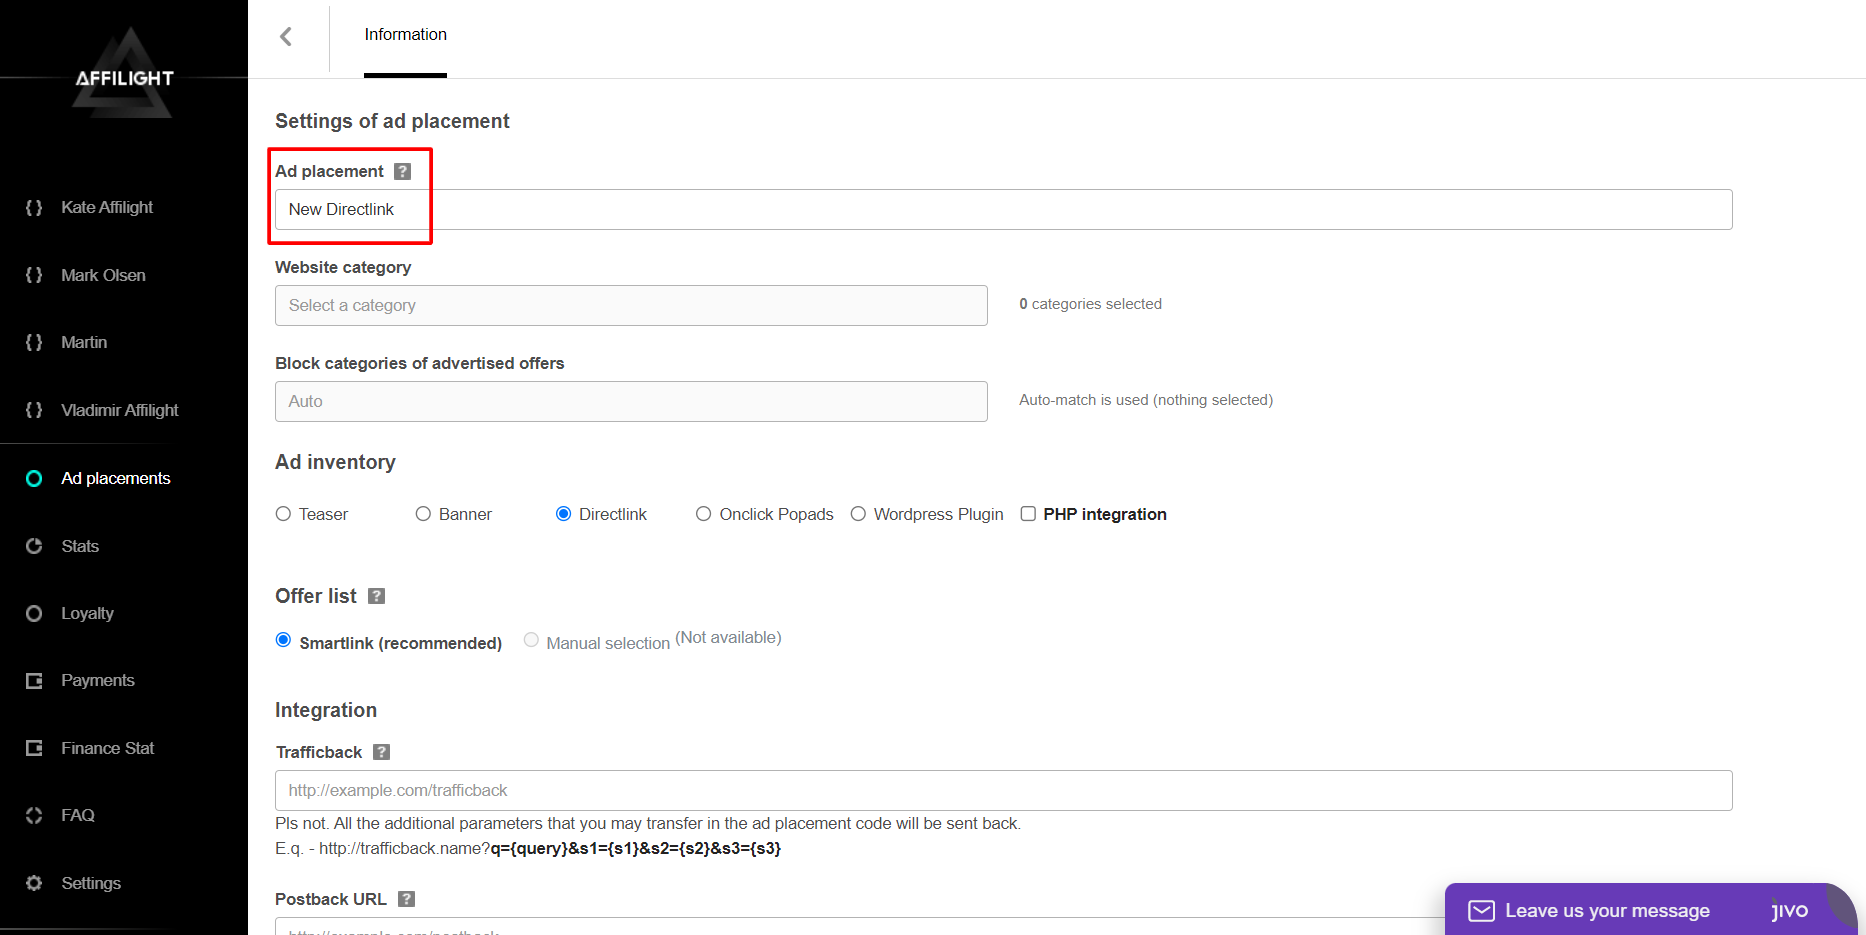
Settings of Ad Placement
Give a name to the ad placement. For example, we will name our ad New Directlink.
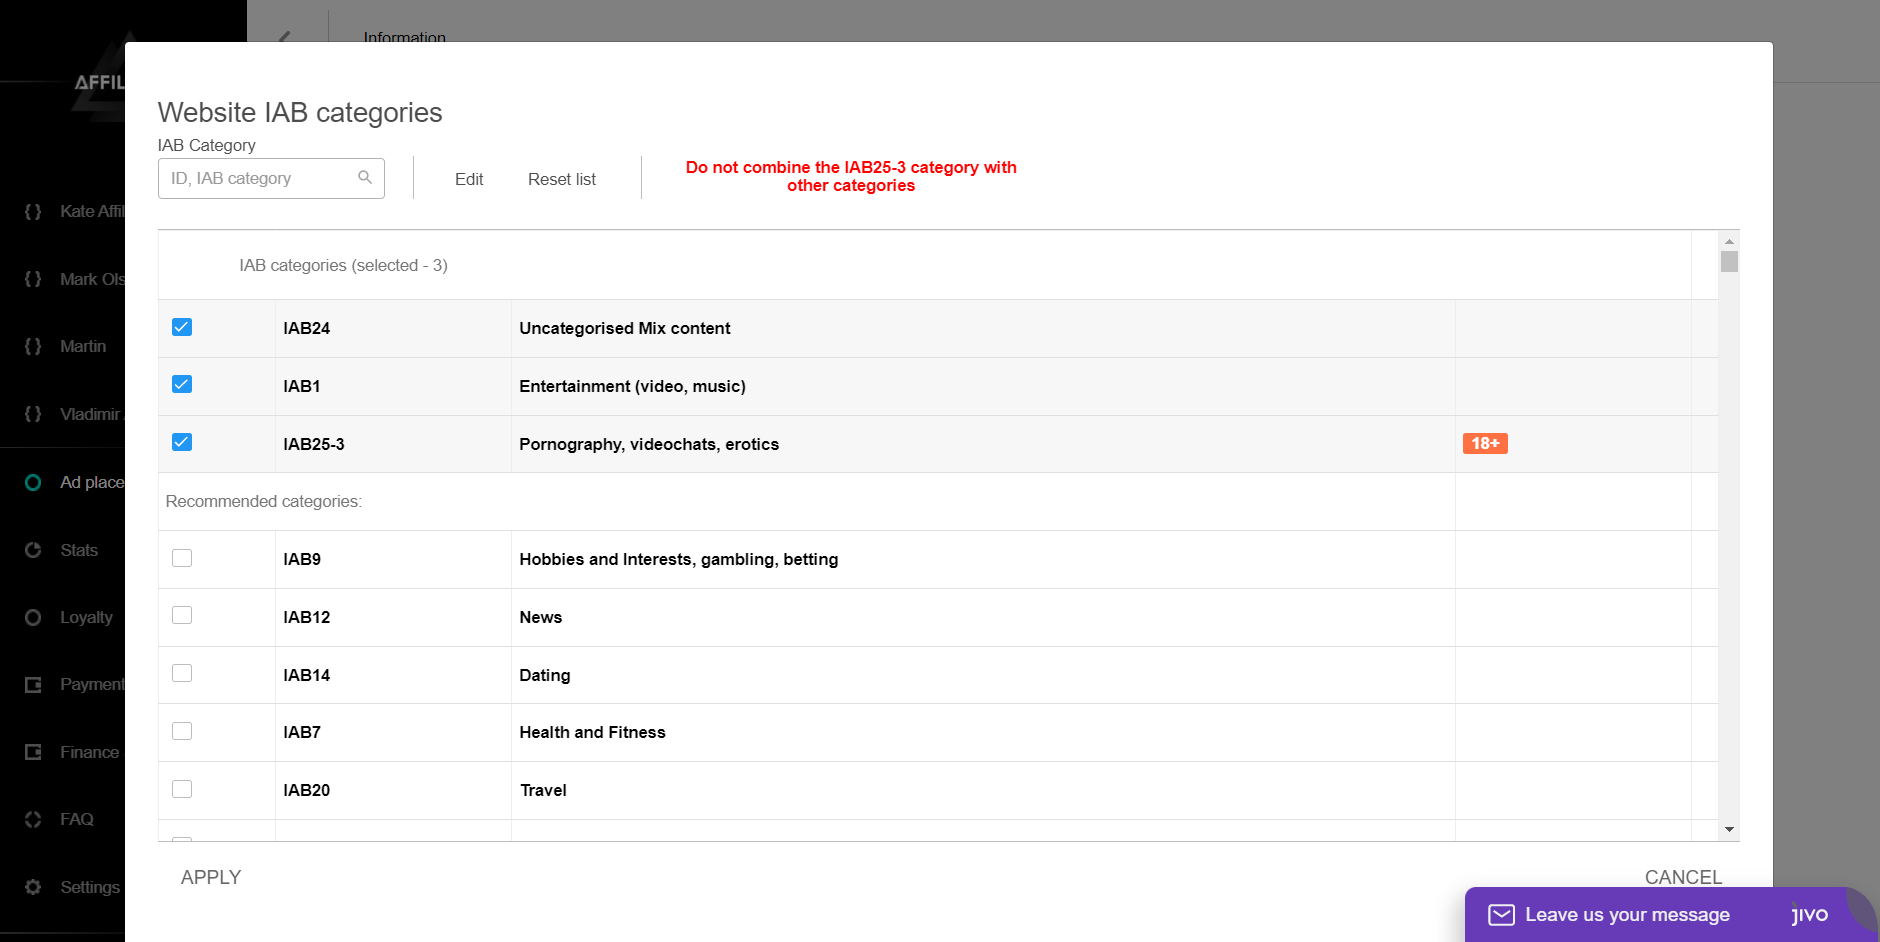
IAB categories is a required setting. You must specify one or more categories to which the platform belongs, as the IAB category is essential for precise targeting.
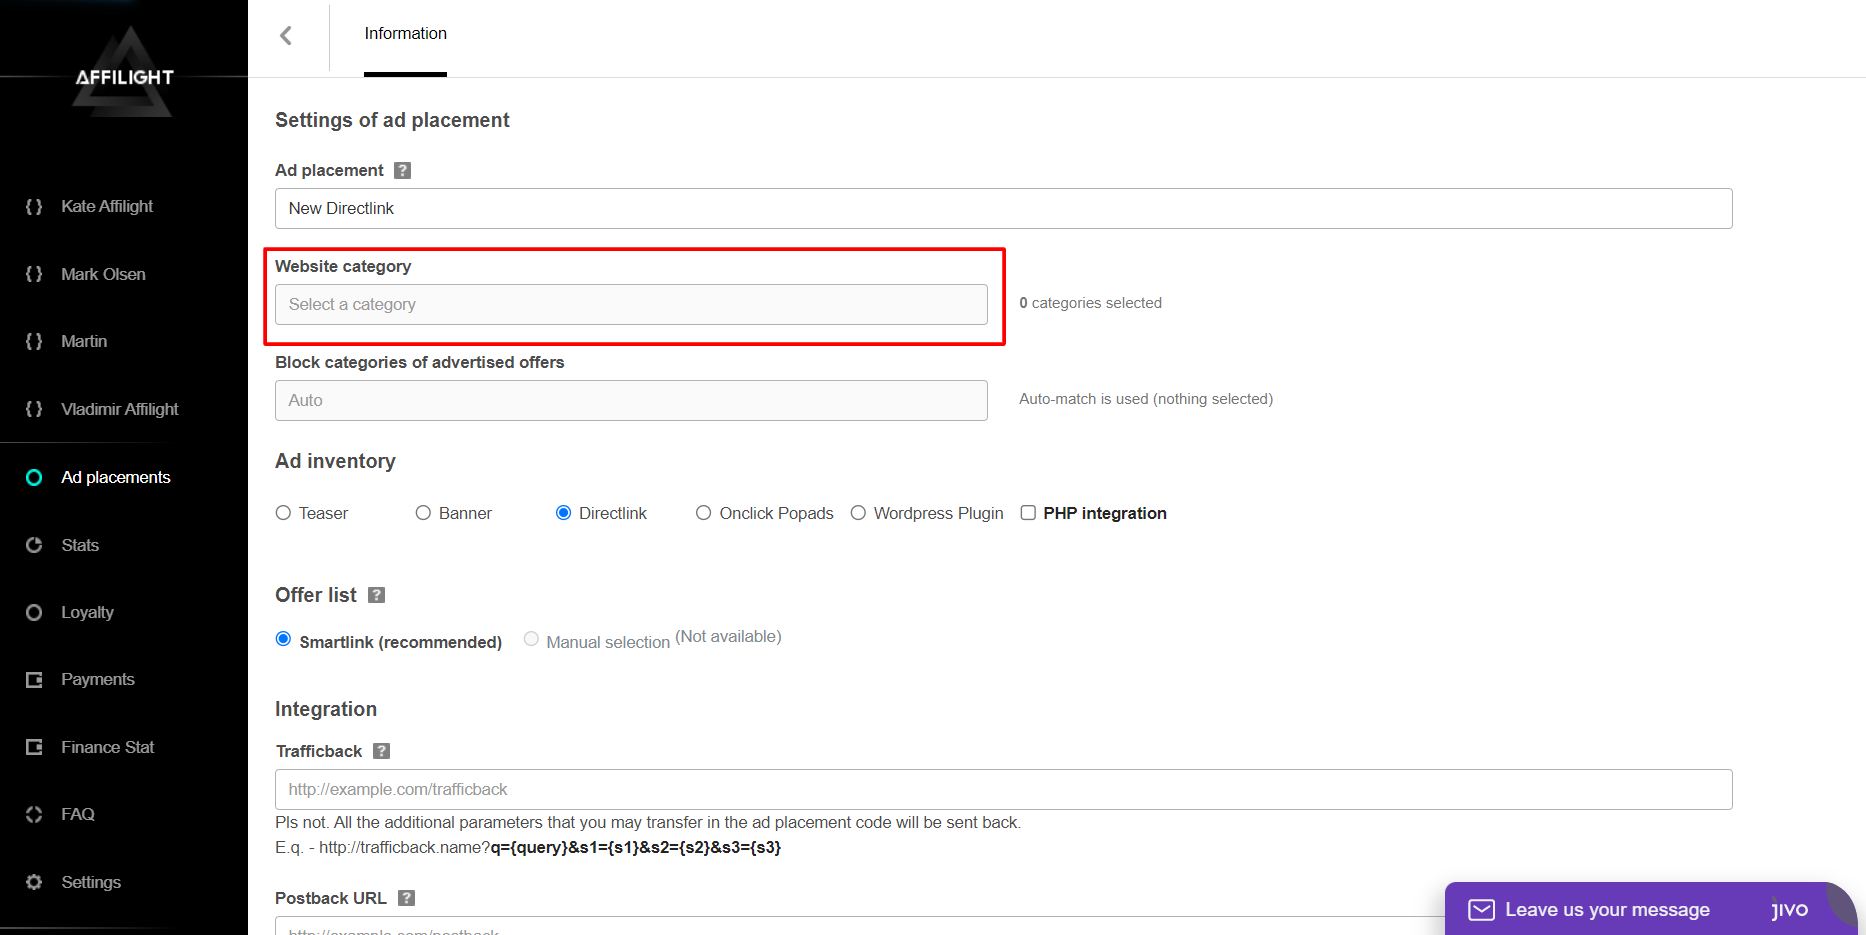
If you are having trouble choosing a category, consider selecting “IAB24 – Uncategorized Mix Content” or “IAB1 – Entertainment (video, music)” as they are broadly defined. If the platform contains sexually explicit content, choose “IAB25-3 – Pornography, videochats, erotica”. Note that only ads for adults will be shown on the platform in this case.
Note: It is recommended to set no more than 10 categories.
If you have selected “IAB25-3 – Pornography, videochats, erotica” do not select any other categories
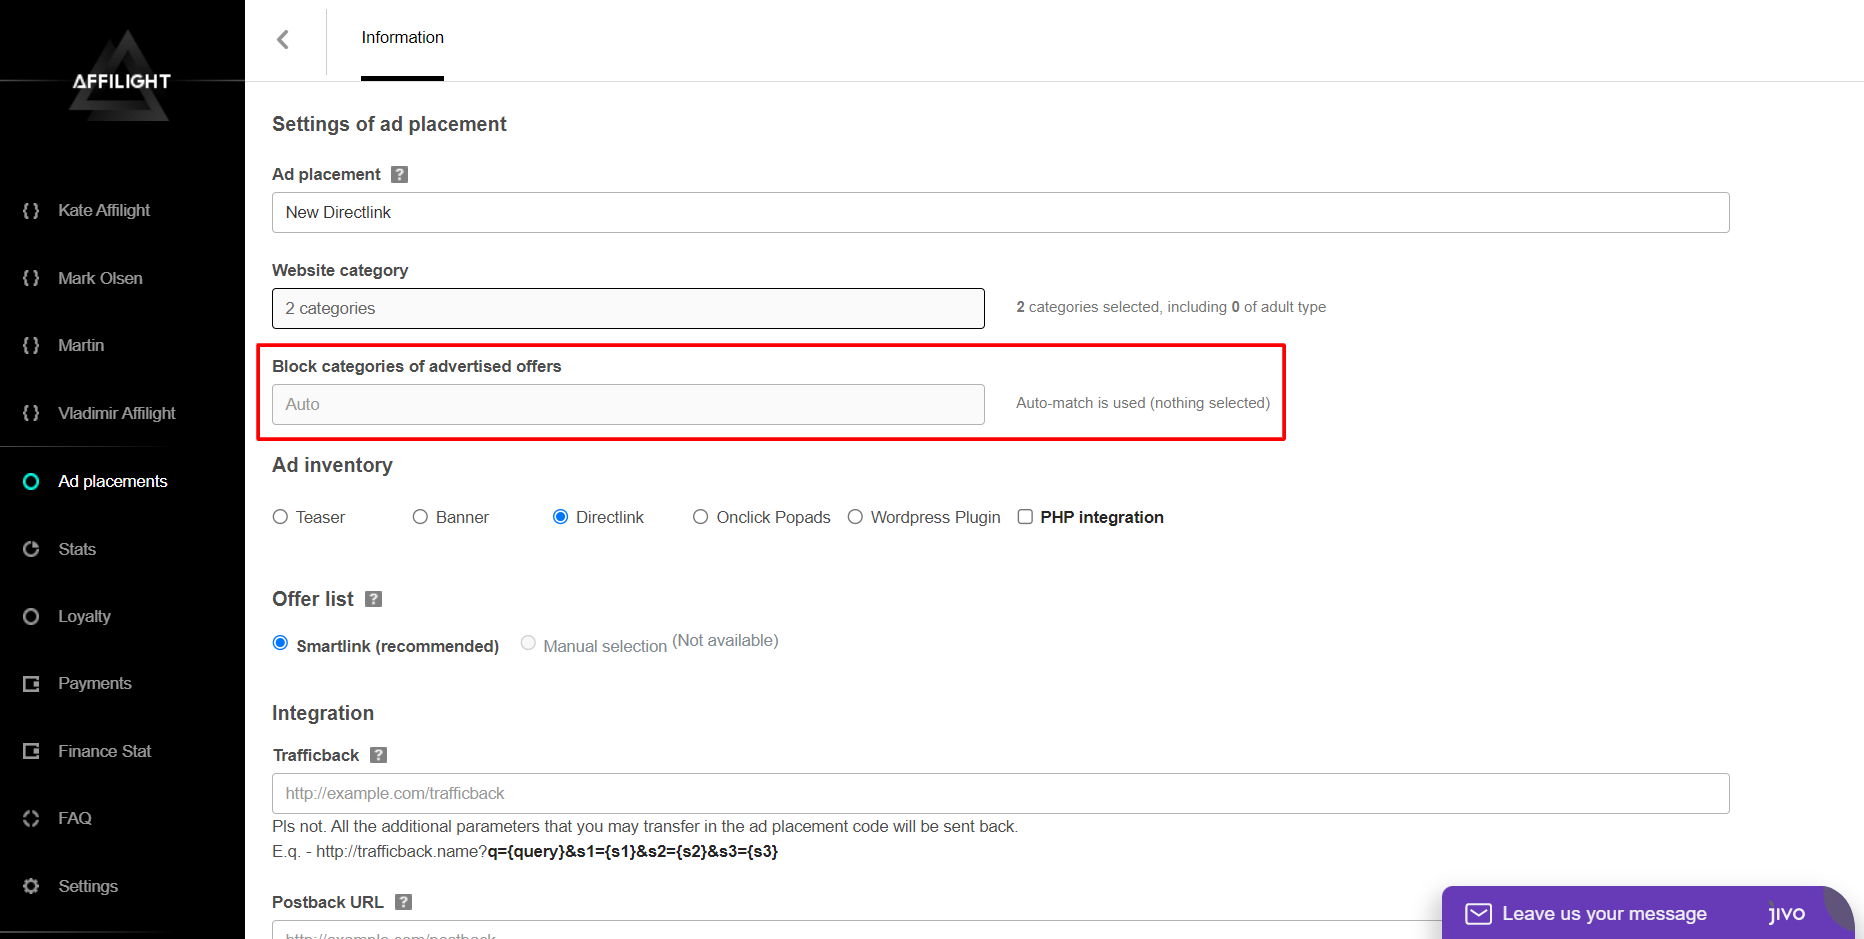
You can also block categories of advertised offers in a similar way to how you set the website IAB categories.
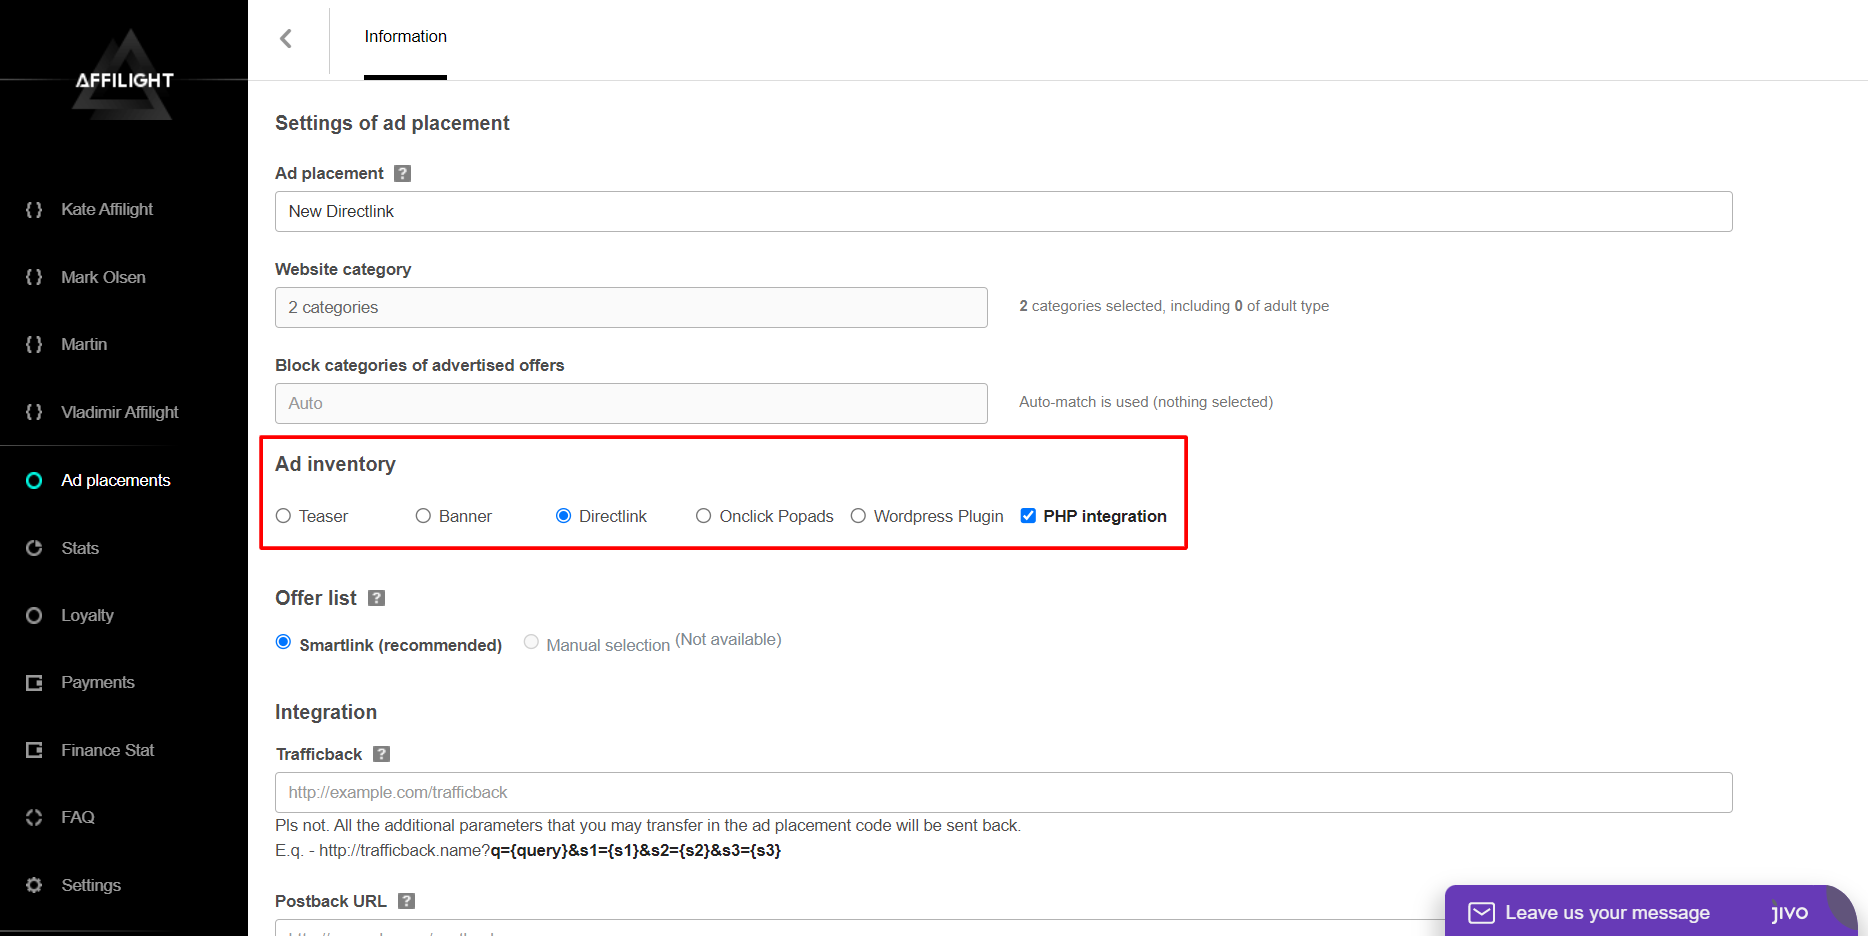
Ad Inventory
Select Directlink and tick the box PHP integration.
Note: Your server must support PHP.
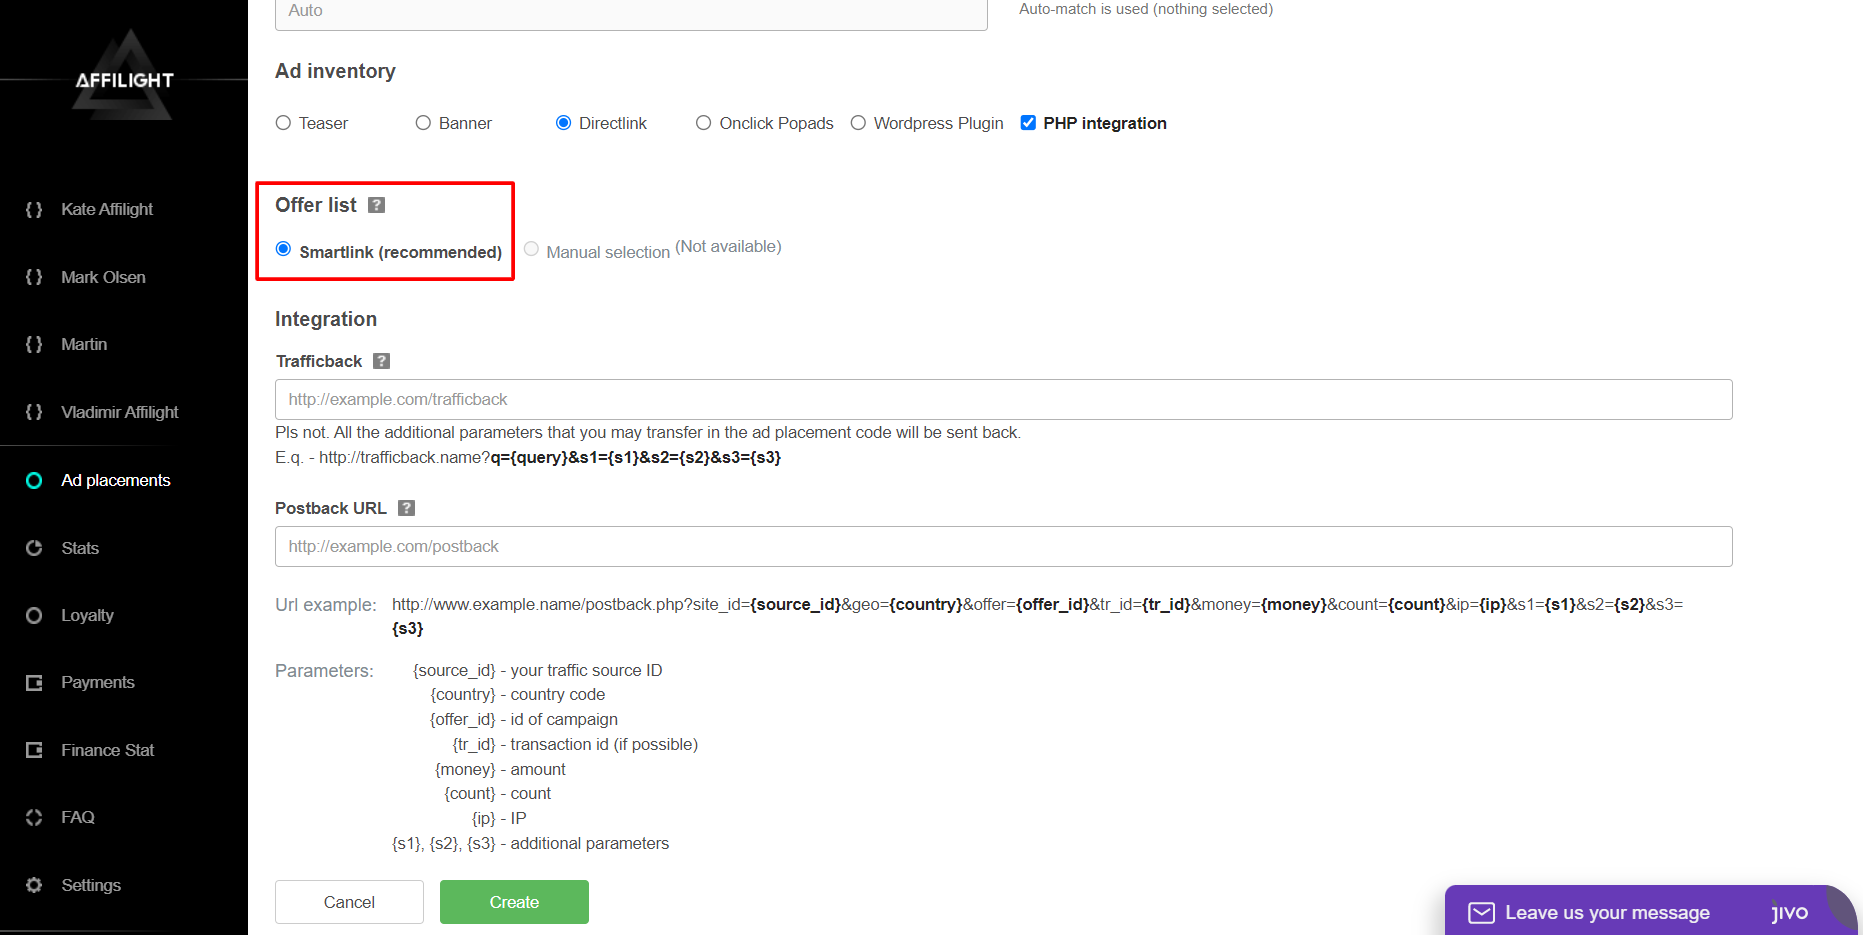
Offer List
Select Smartlink. It is a link that automatically selects the offers by a number of parameters. This way of monetization is one of the most convenient and easy to use. Particular offers or verticals can be set up (or blocked) by an Affilight manager on your request.
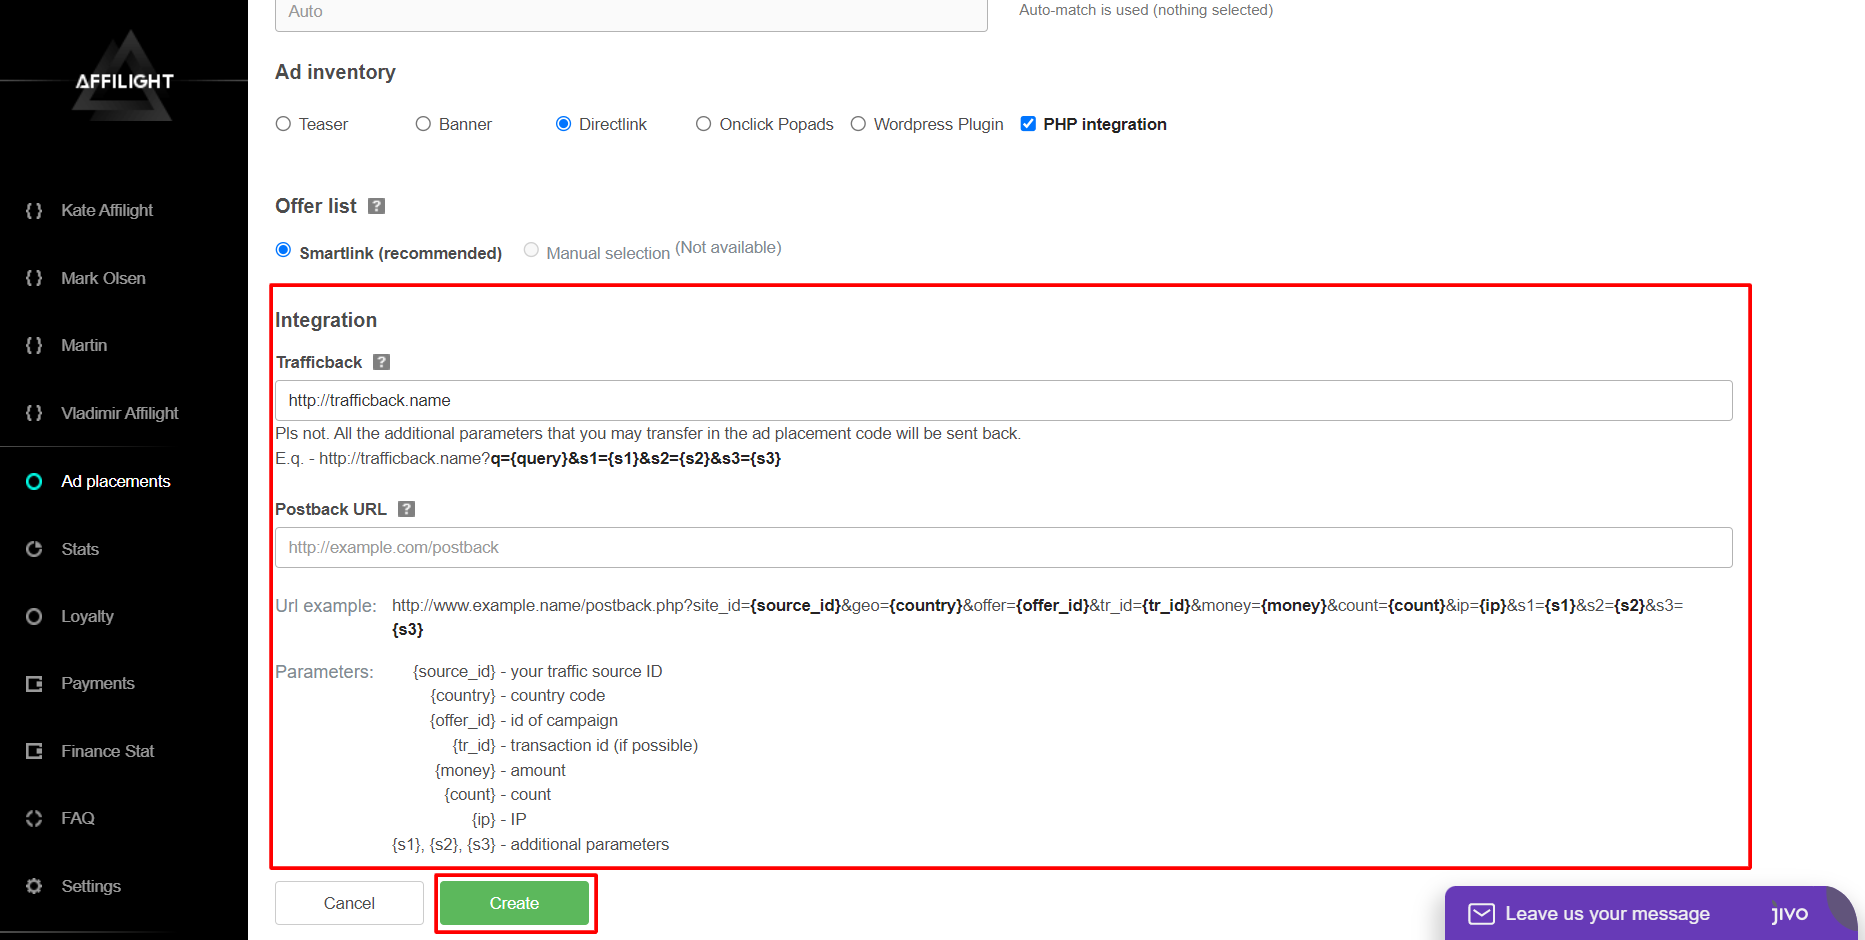
Integration
Trafficback URL is important for traffic and restrictions settings. If we didn’t find ads for a user or we couldn’t accept, for example, desktop traffic then some users see a page 404. If you want to avoid that, specify a page of your website or another ad network as a trafficback. Anytime our system can’t find a suitable ad or a show was blocked, your traffic will be redirected to trafficback and you lose nothing.
Besides, you can add specific parameters in your trafficback. Some networks ask to send them additional information. In our system you can use the following parameters:
- {QUERY} is a keyword. A title of the page is used in the popup script as a keyword by default.
- S1, S2, S3 are additional parameters. How and when use it you can read below.
If you use third-party affiliate tracker then it makes sense to set up Postback. If you need any help, ask our managers to set it up for you. Most publishers don’t need to fill it. You can find a detailed statistic about your traffic in the section Stats.
When all the data is entered, click Create.
PHP Integration
Visit the Connection section and copy the code.
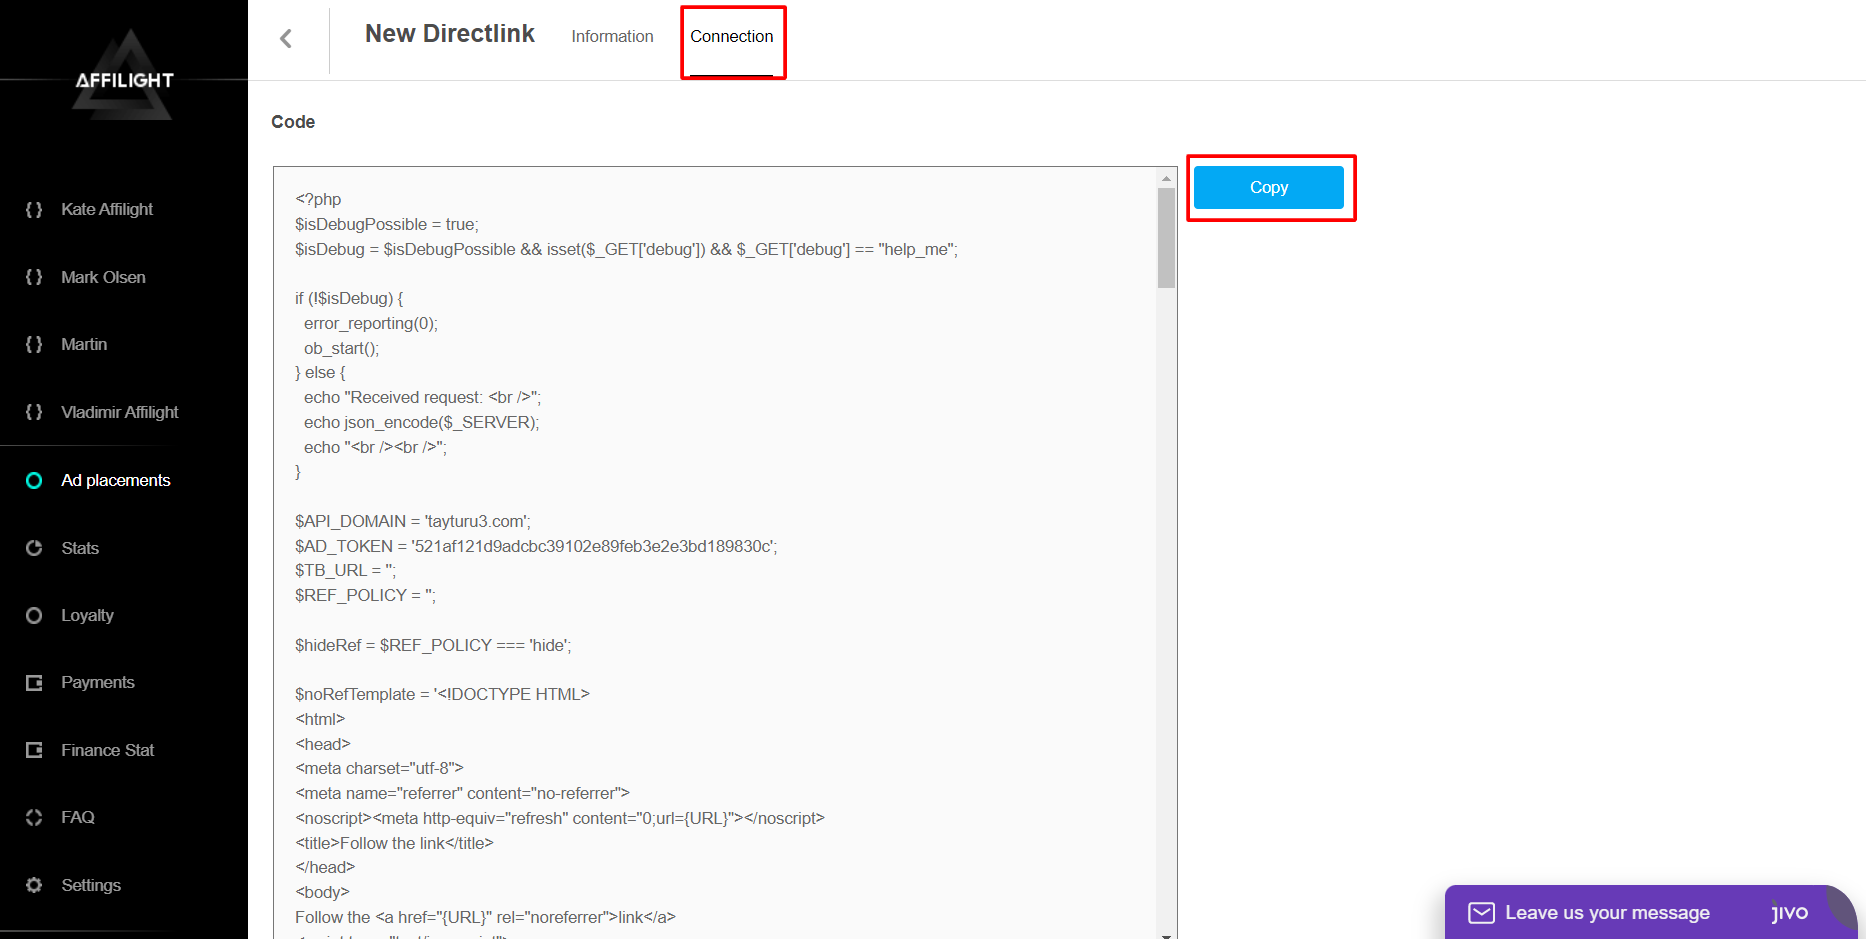
We consider an example where the code will be placed in the directory “/search/”. Create this directory and save the code inside as a file “index.php”.
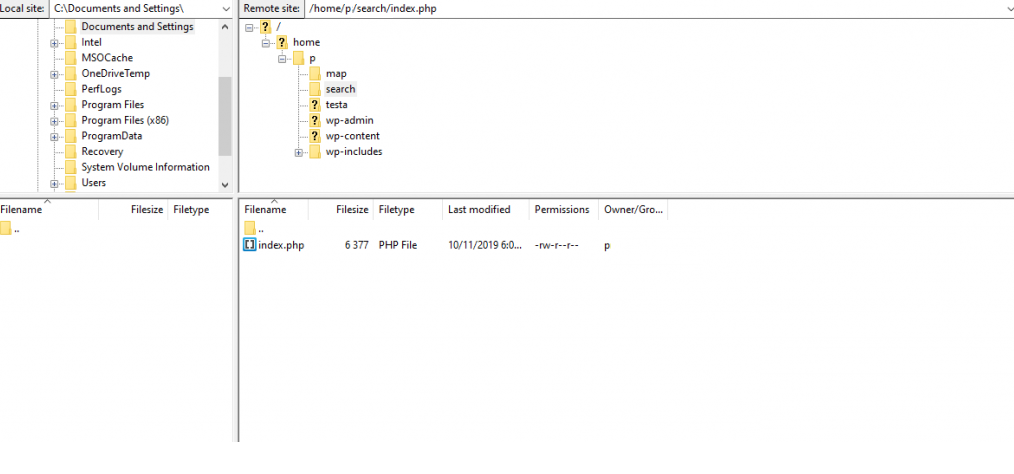
The code will look like: https://mywebsite.com/search/index.php
Add the ?q=KEYWORD option at the end of the link. A keyword depends on the context.
In the end, your link should be as follows: https://mywebsite.com/search.php?q=KEYWORD
Click on your link and you will be redirected to the ads. Now you can use this link and forget about the update of promo domains. It will be automatically updated.
How to Use Directlink with PHP Integration on Your Website
There are many different ways to use directlink. In this article we are going to consider only a particular case — create a banner with the download button.
Here is a code in a simplified way:
<a href="DIRECTLINK HERE" target="_blank"><img src="LINK TO IMAGE" alt="Download-Button" border="0"></a>Instead of DIRECTLINK HERE insert your directlink. Change LINK TO IMAGE to the link with your future button image.
In our example we are going to use the following code:
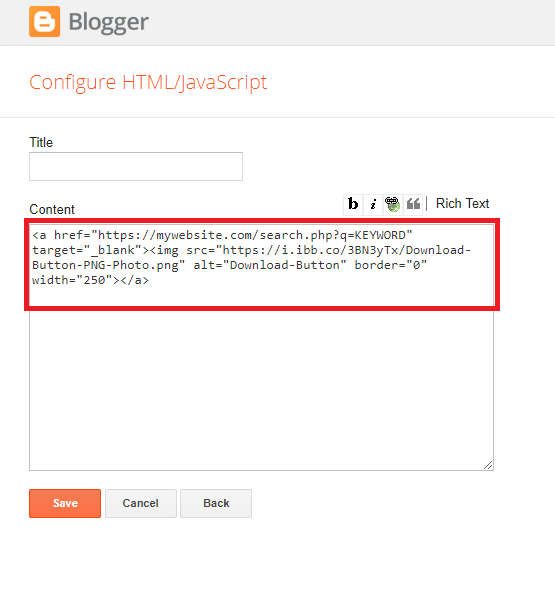
<a href="https://mywebsite.com/search.php?q=KEYWORD" target="_blank"><img src="https://i.ibb.co/3BN3yTx/Download-Button-PNG-Photo.png" alt="Download-Button" border="0" width="250"></a>Note: If the picture is too big, specify the width parameter.
Adding User Parameters for Traffic Optimization
You need to add a few user parameters for each link, that you place on your recourses. It may look that way:
http://sample.com/r?token=115abe184c5c5f950f565a3c4b7b30c9535eac9e&q={QUERY}&s1={S1}&s2={S2}&s3={S3}There are the following types of user parameters:
- &q={QUERY} — you need to change {QUERY} to a keyword or a phrase that will improve targeting.
- &s1={S1} — instead of {S1} place a traffic source. For example, if a link is placed on a particular website, change {S1} to its domain name. If you buy traffic in another advertising network or use our directlink for trafficback — you can change {S1} to the name of an ad network or code definition.
- &s2={S2} — instead of {S2} you have to put traffic subsource. It might be useful in some cases. For example, when you buy traffic from another advertising network and send it to our directlink. Also, you have a few different campaigns from this advertising network. In this situation directlink and user parameters for two campaigns would look like this:
http://sample.com/r?token=115abe184c5c5f950f565a3c4b7b30c9535eac9e&q={QUERY}&s1=ad_network_1&s2=campaign_1
http://sample.com/r?token=115abe184c5c5f950f565a3c4b7b30c9535eac9e&q={QUERY}&s1=ad_network_1&s2=campaign_2 - &s3={S3} — instead of {S3} you can write click_id when you are going to use postback. If you buy traffic from another ad network then you can use generated click_id from this network. In this case change click_id to a macro of another ad network. For each ad network, click_id macro will be unique. If you place a link on your website then you need to generate click_id by yourself.
Note: User parameter &q={QUERY} is obligatory because it can improve your website’s conversion rate. Usually, publishers change {QUERY} to the title page. Depends on a website it can be placed whether manually for each link or automatic.
In this guide, we are going to consider automatic keyword substitution based on CMS WordPress example. If you use another CMS, you need to find the method of keyword substitution in a link by yourself.
If you can’t (for whatever reason) replace a value in a user parameter &q dynamically then you need to write a keyword that will give an overview of traffic. For example, on the download website, you might use this option: &q=download.
User parameters S1, S2, and S3 are optional. But the more accurate they are, the higher conversions you get.
For example, you can place the same link on the two different websites. If you change S1 to (&s1=website.com and &s1=website2.com), then we will understand which website has better conversion and how to optimize each of them. Without this information, we can’t optimize your sites.
Now let’s consider a few ways of script integration.
Adding Script to HTML Code
As an example, we will use a text editor and HTML template on w3schools.com. Visit this page.
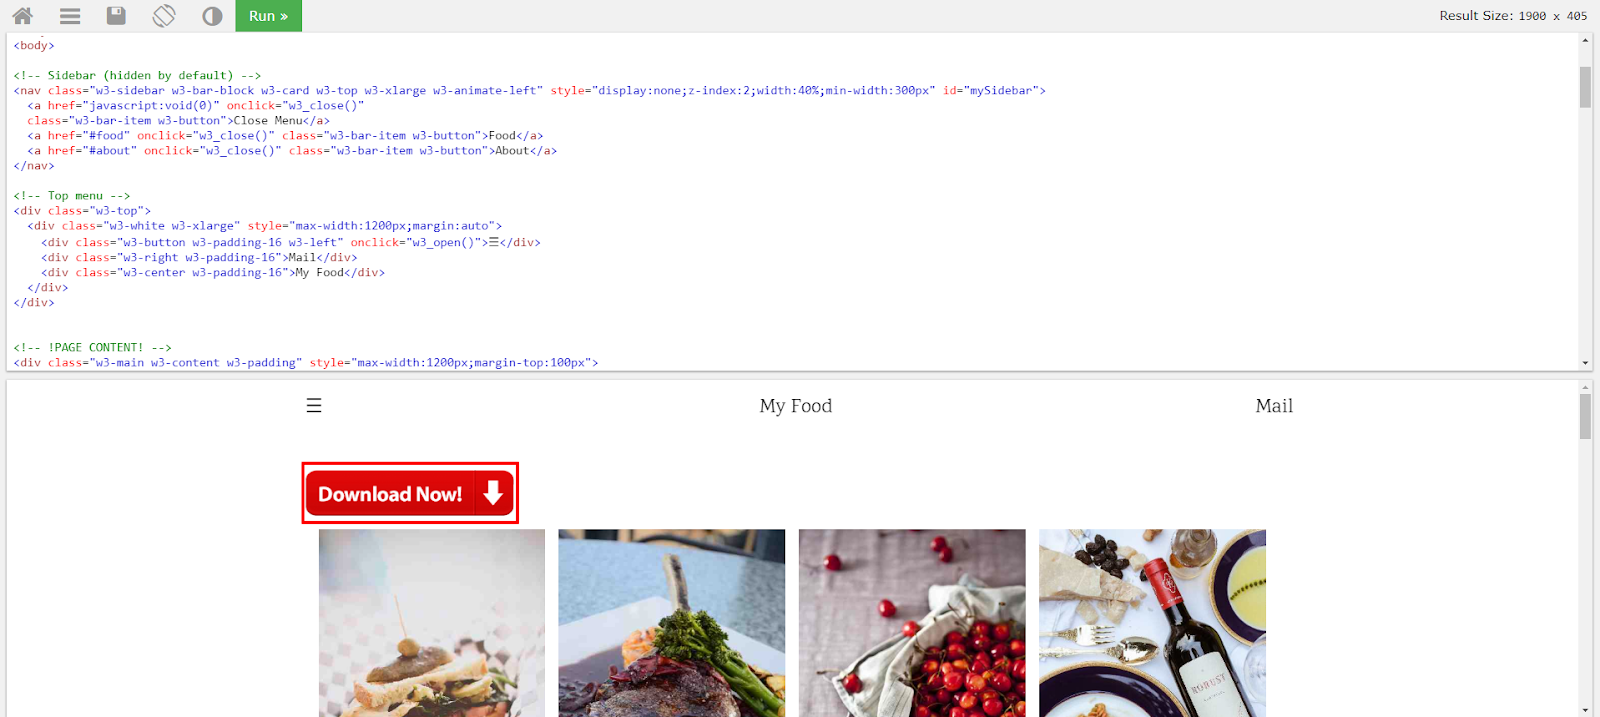
Find a place for the button Download and insert there a specific code, that we mentioned above. Don’t forget to change user parameter {QUERY} to a keyword. Press the Run button.
<a href="https://mywebsite.com/search.php?q=KEYWORD" target="_blank"><img src="https://i.ibb.co/3BN3yTx/Download-Button-PNG-Photo.png" alt="Download-Button" border="0" width="250"></a>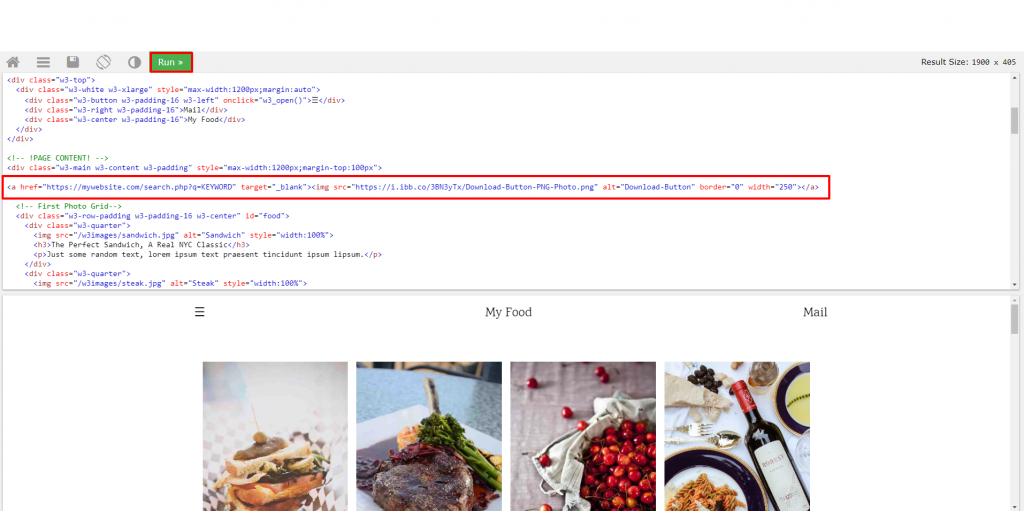
After that, you will see the Download button. Press it.
An ad will be open in a new tab.
Note: It is better to place Download buttons above the main content or below the main content.
If the platform has just been created, the script may not work on the page. It takes some time to activate a new platform. Wait 10-15 minutes, then check it again.
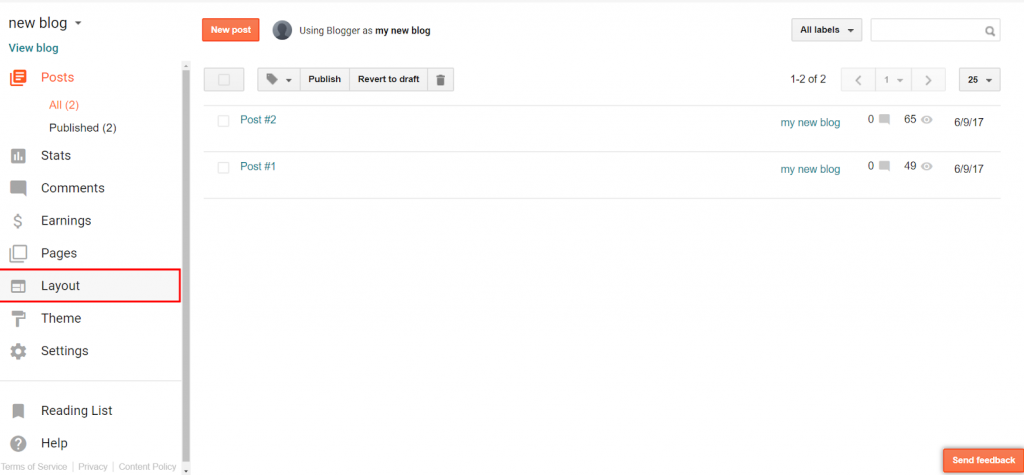
Adding Script via CMS Blogger
To add the button Download in CMS Blogger, we will use built-in gadgets. With them, it’s easy to insert the chosen button not only on all pages but also on specific posts.
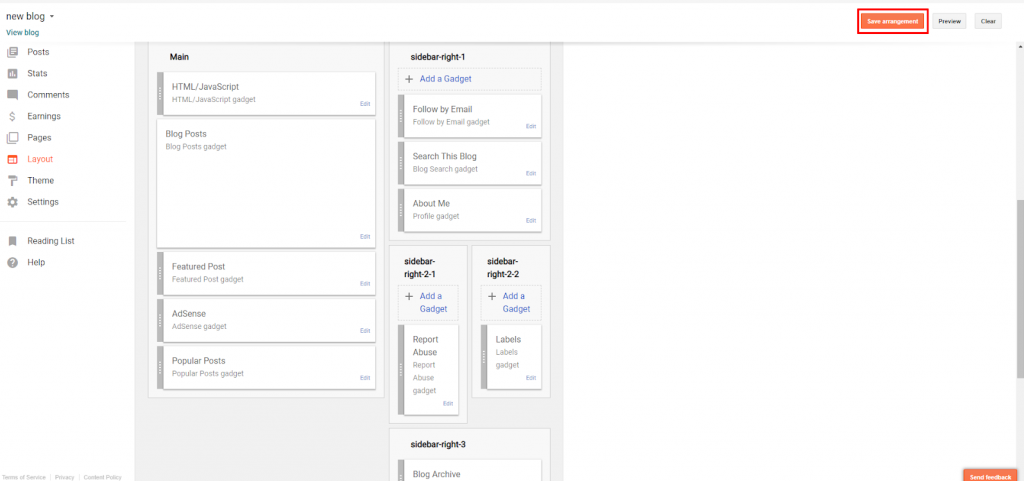
Go to your Blogger account and visit the section Layout.
In a new window, click Add a Gadget.
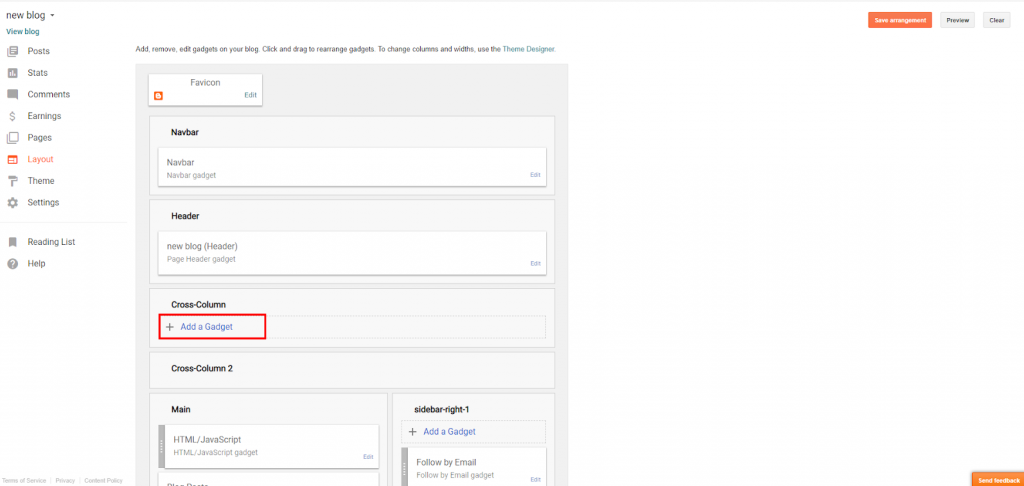
Click on HTML/JavaScript gadget.

In the field Content add the code and click Save.
Transfer this gadget in the left column Main, in the place you want to put the button. In our case, we added it above the main content.
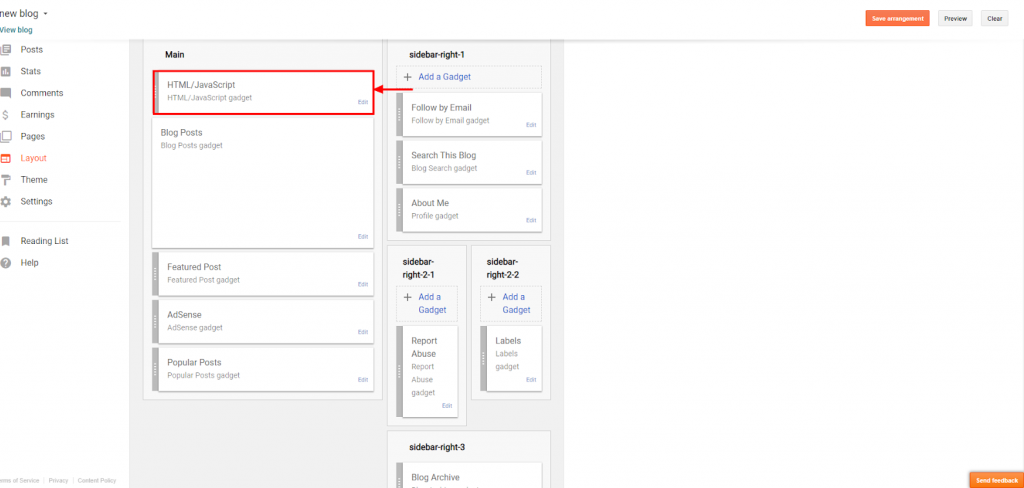
Now click Save arrangement — script will become active. The Download button will appear on the website page.
Adding Script via CMS WordPress
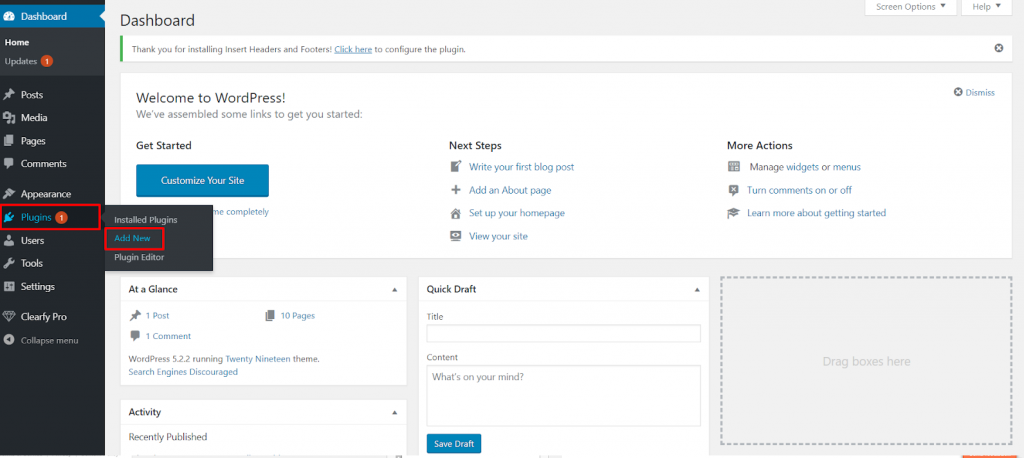
If you use WordPress CMS, then you can insert the link of the script in two ways: make changes in the theme of your site on WordPress or use a special plugin. The easiest and fastest way is to use the plugin. We will consider it further:
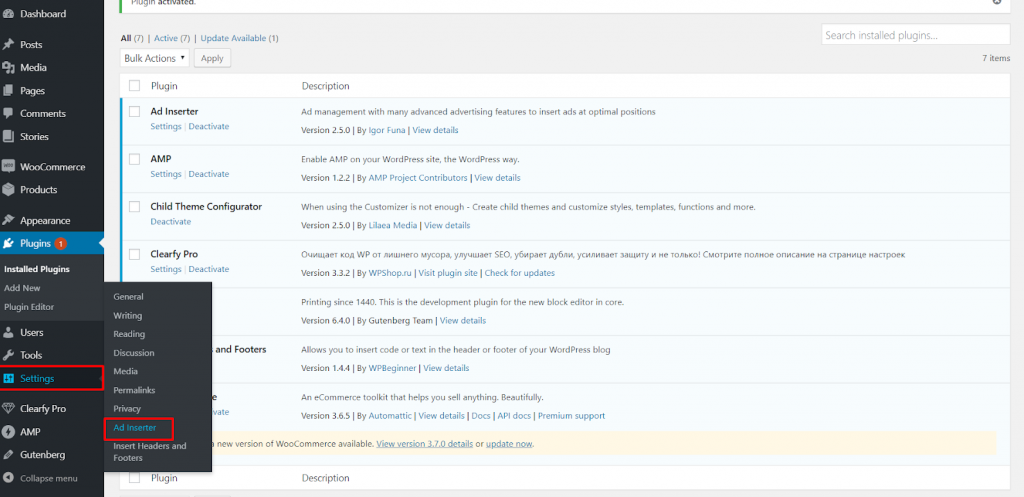
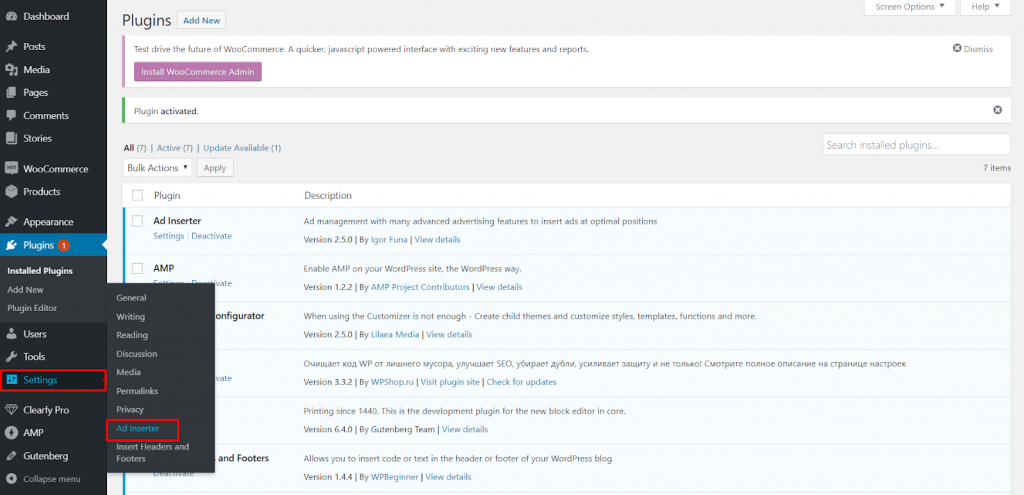
Go to the admin panel of your site on WordPress. Open the Plugins tab and click Add New.
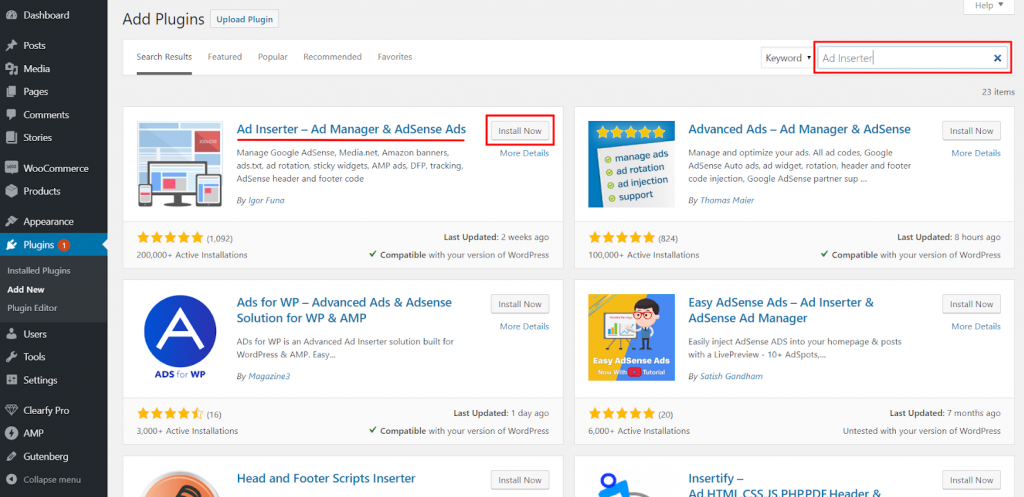
Search for Ad Inserter — Ad Manager & AdSense Ads plugin and click Install now.
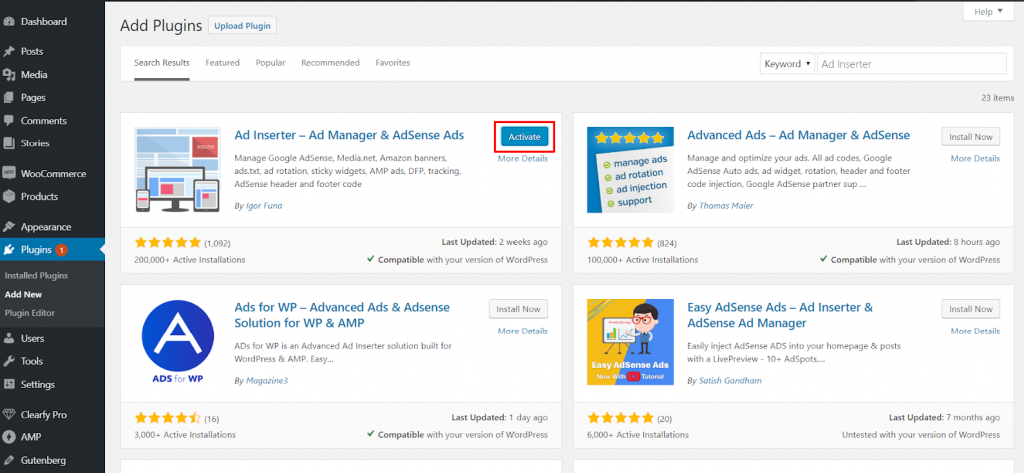
Activate it.
After that, go to Settings — Ad Inserter.
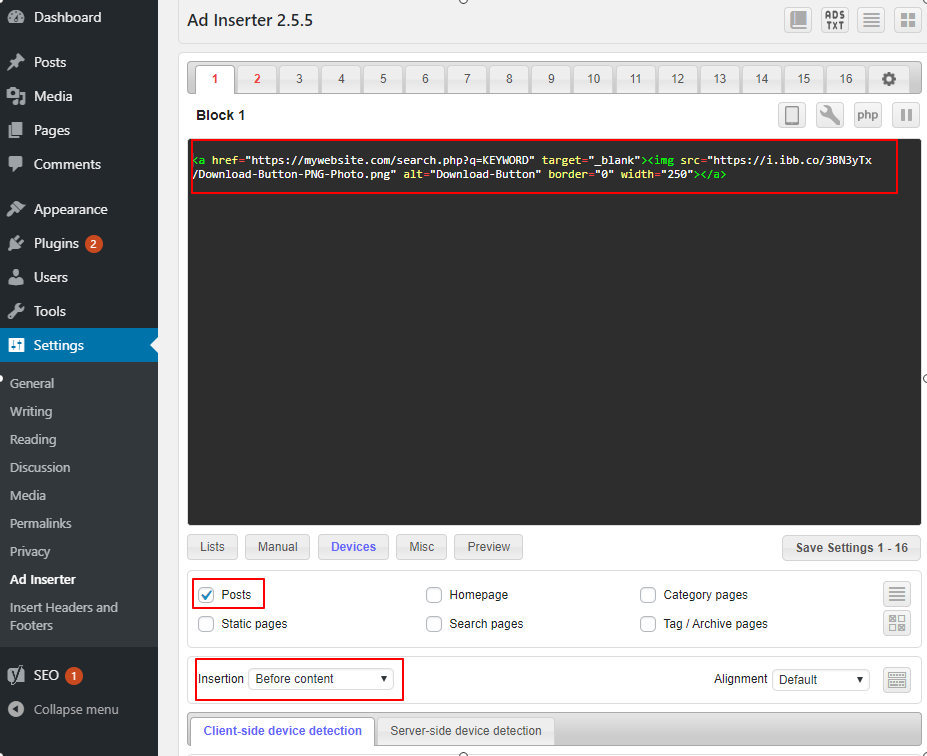
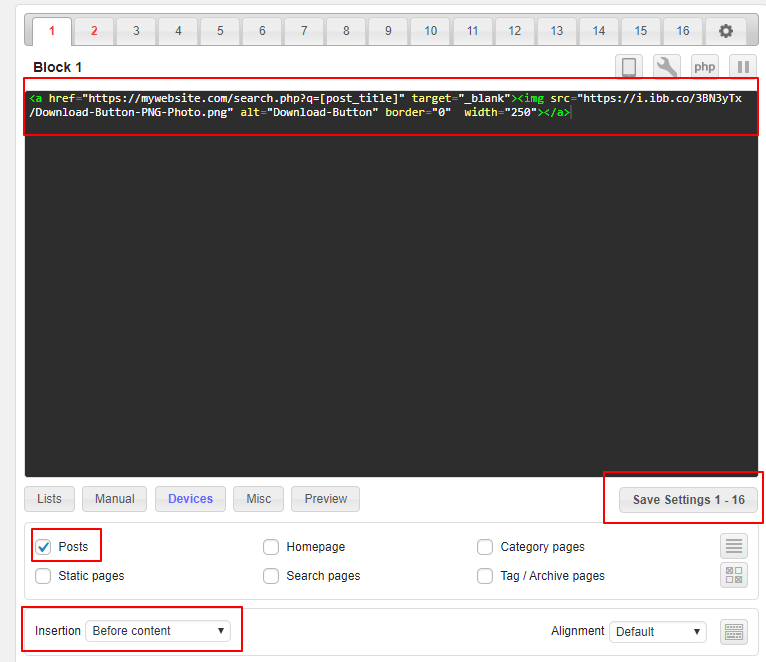
Insert the link of the script in the field Block 1. In this example, we will add the button Download right after the title of the main content. Tick the box Posts and choose Before content from the list. Click Save Settings.
The Download button will appear on the page and will be placed below the title.
Keyword Substitution
As we mentioned above, user parameter &q is obligatory. Thanks to keyword substitution, conversion and revenue can increase. In our example, we are going to replace {QUERY} by a page title because in most cases, it provides the most complete and accurate description of the page content.
Thanks to setting up keyword substitution you can get automatic substitutional of a user parameter q.
Here we use the title because it fully described the page’s content.
Note: We can suggest you an easier way. Install our plugin WordPress Plugin for Download sites.
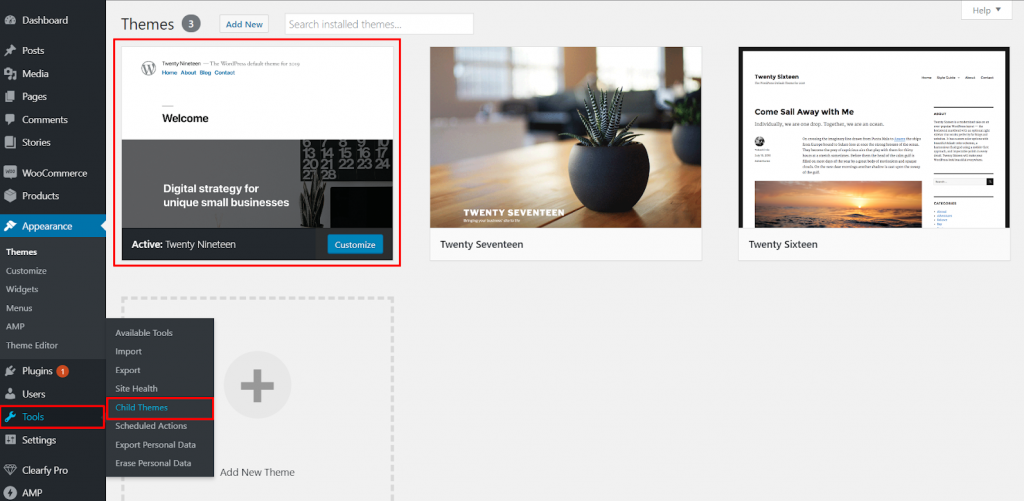
In order to substitute the title of the page in the user parameter q, you need to create a shortcode. At first, make sure that you use a child theme on your website. If you don’t have a child theme, then use a plugin Child Theme Configurator to create it.
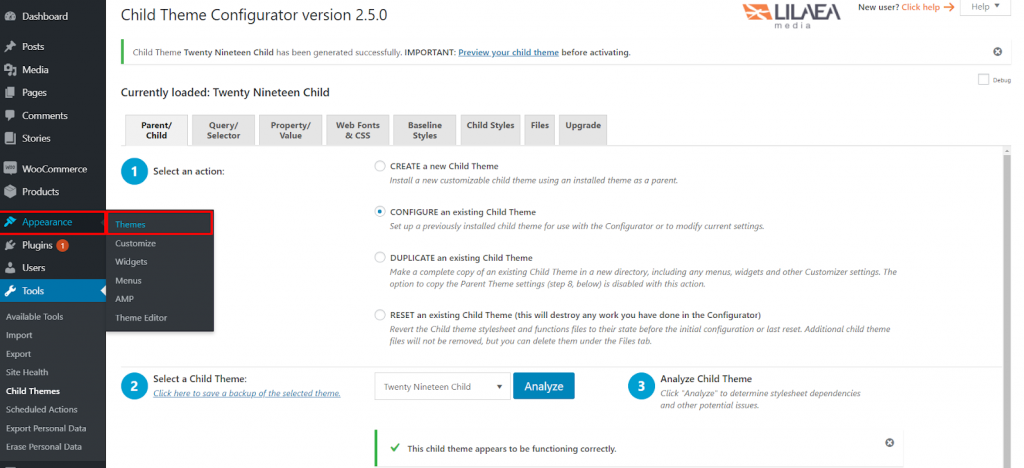
In our example, we don’t have a child theme, so we will create one. Visit the section Tools — Child Themes.
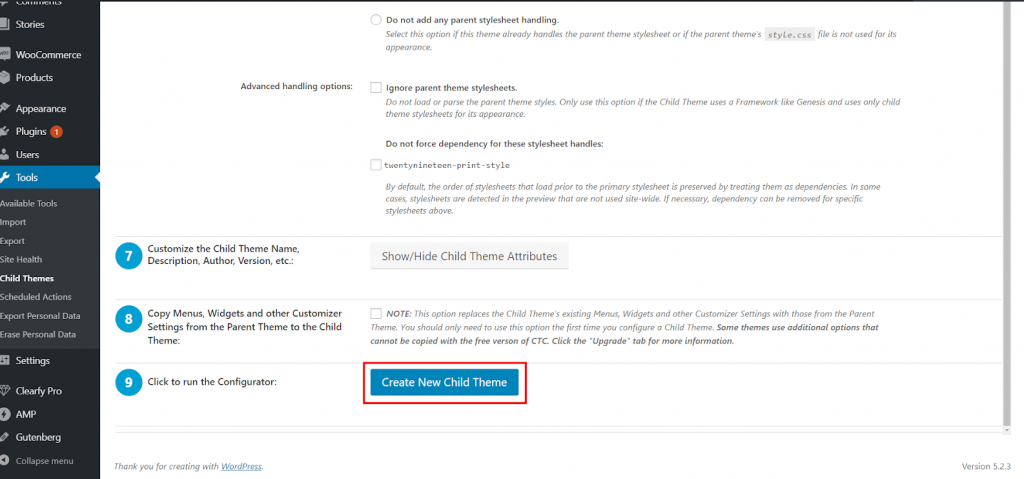
Tick the box Create a new Child Theme and choose the theme you use. Click Analyze.
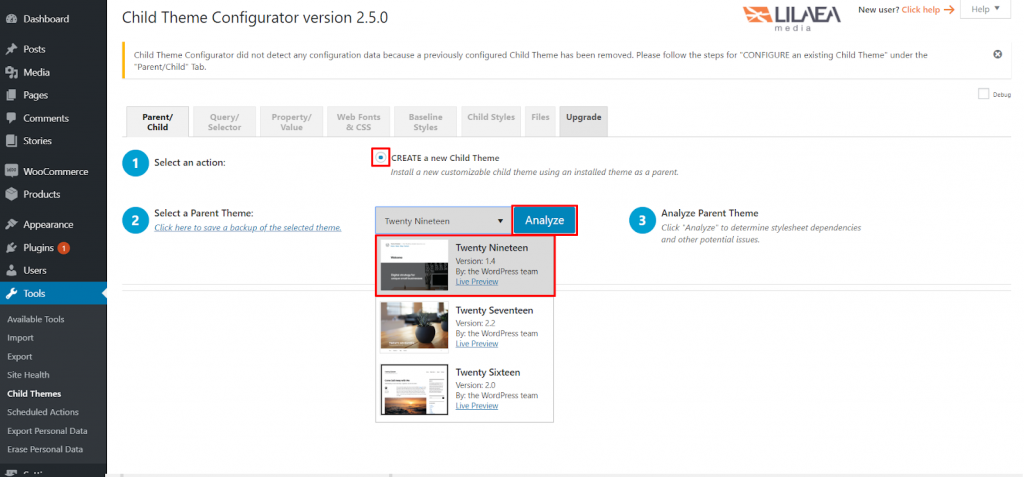
Scroll down to the bottom of the page and click the button Create New Child Theme.
As soon as the child theme is created, visit the section Appearance — Themes.
Now make sure that your new theme is active.
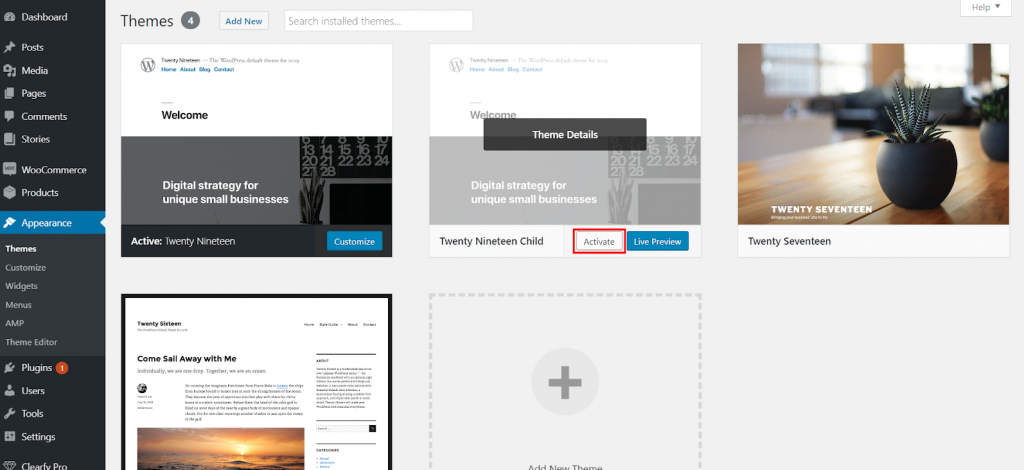
Note: Changing a theme on a WordPress website can lead to unintended consequences. In most cases, Child theme activation should not cause any problem. However, we must warn you of the possible consequences.
Use your file manager, go to the directory where WordPress is placed and find a file with the child theme. Usually, the address is wp-content/themes/your-theme-child.

Open the file functions.php and add the following code in the end of the file.
function post_title_shortcode(){ return get_the_title(); } add_shortcode('post_title','post_title_shortcode'); 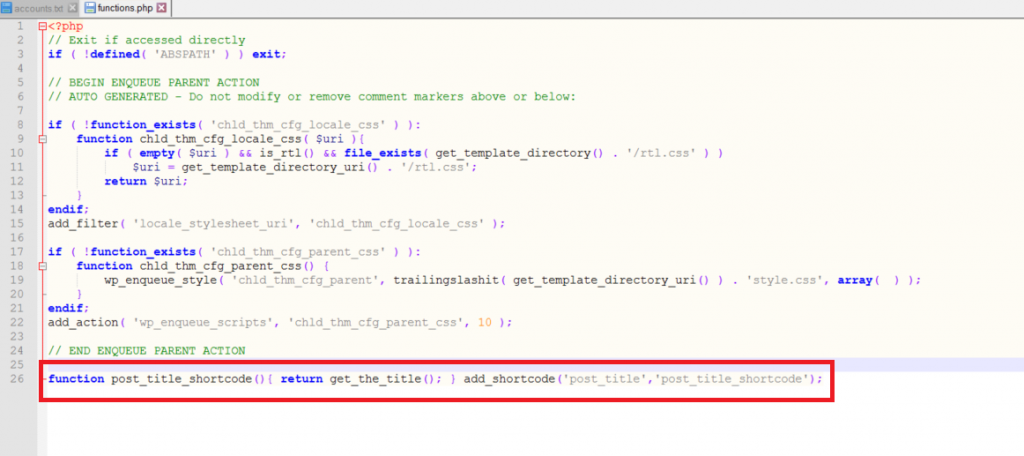
Save the file and make sure that the changes took effect. If you add in the text of the post shortcode [post_title], then there will display a post title.
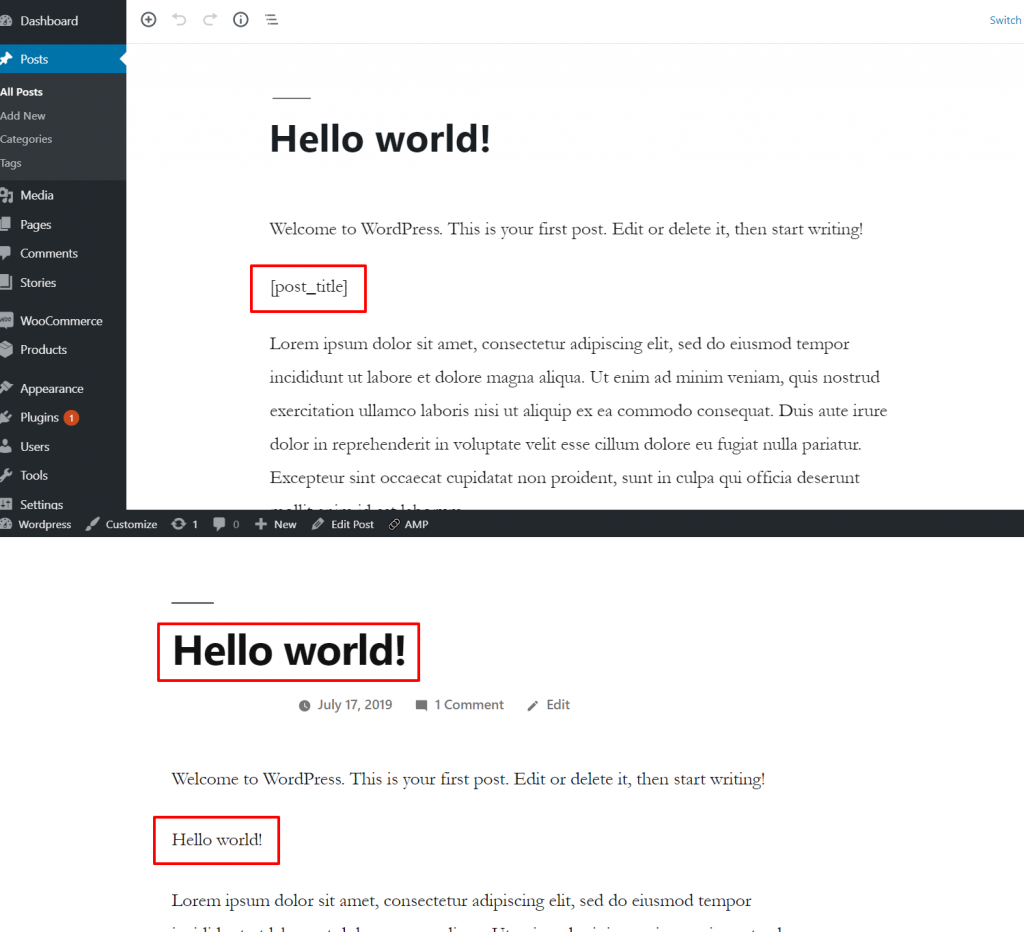
If everything works correctly then you can complement directlink. Now it will look like this:
https://mywebsite.com/search.php?q=[post_title]Let’s go back to the WordPress section Settings — Ad Inserter.
In the field Block 1 add the shortcode to directlink, which is used in the Download button. The result should be similar to this one:
<a href="https://mywebsite.com/search.php?q=[post_title]" target="_blank"><img src="https://i.ibb.co/3BN3yTx/Download-Button-PNG-Photo.png" alt="Download-Button" border="0" width="250"></a>Click Save Settings.
Now check if the keyword is being inserted into your link correctly. To do this, open any post on the site, right-click on the Download button and click View Code. In case of successful placement in the sidebar, you will see a link, provided that the title of the article is “Hello World”:
http://mywebsite.com/r/?token=74985c2e6624f2e3de88ac75977c39c86bbd2b6d&q=Hello%20world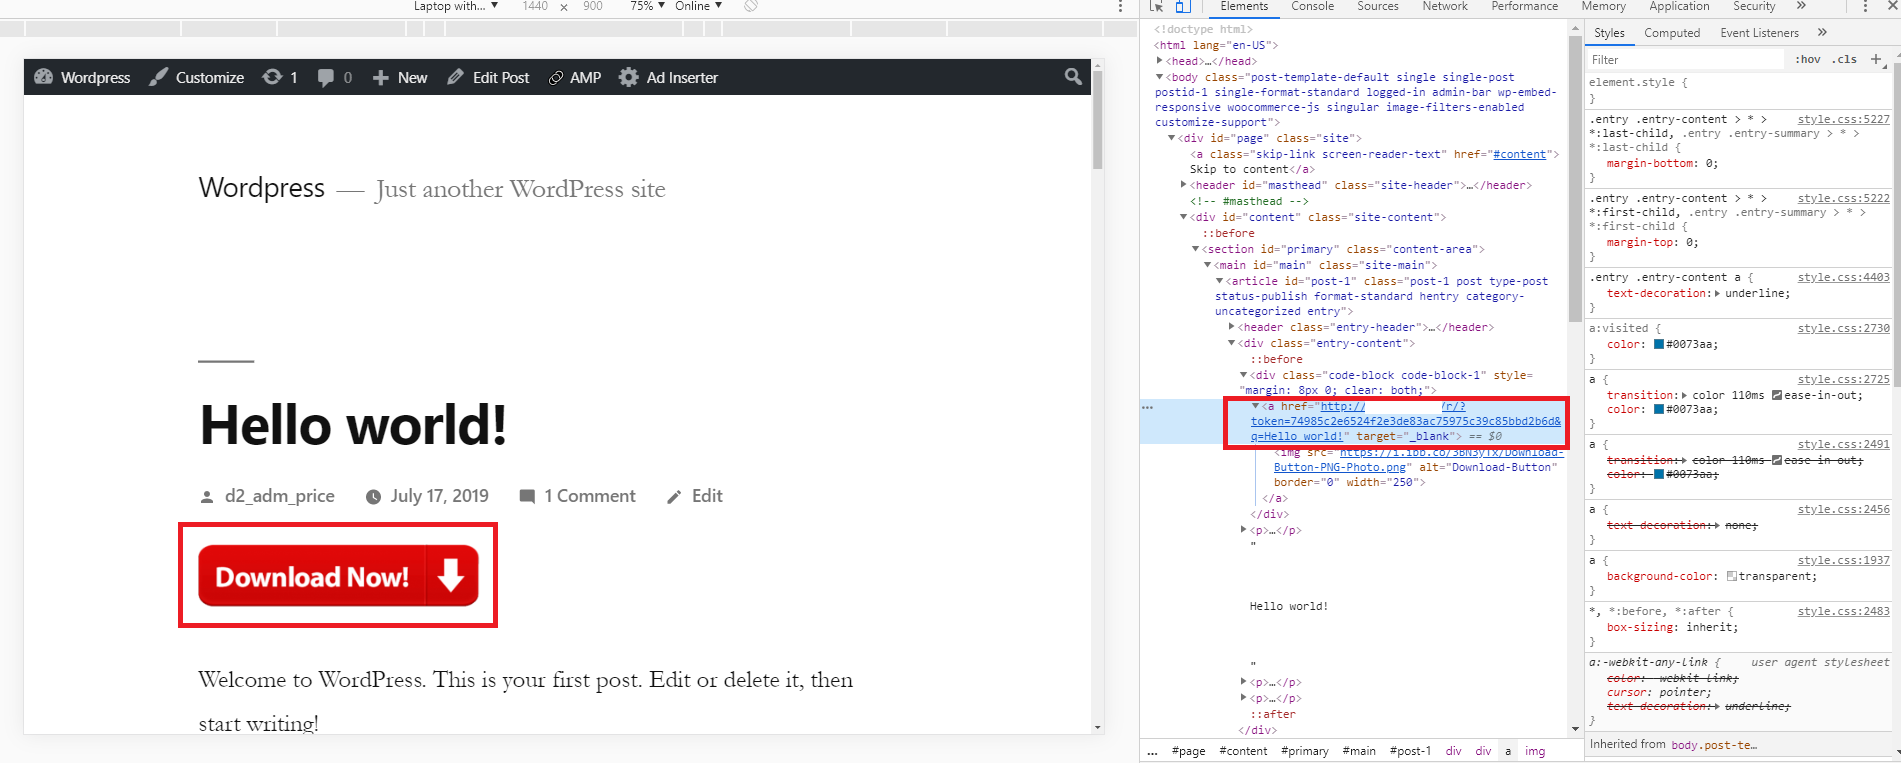
Final Notes
- Fill in sections such as Settings of ad placement, Ad inventory, Offer list, and Integration is obligatory.
- When you set up Directlink pay special attention to Trafficback.
- Copy and paste on your website a link of the script that you received.
- Don’t forget about a &q parameter during Directlink integration because it must be added to the link.